
In order to get the best possible performance in terms of resistance to wind, rain, or hail, the sail must be correctly tensioned.
One of the most crucial aspects of assembly is proper tensioning.
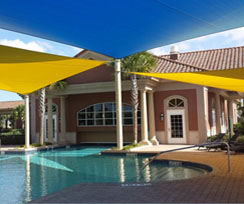
A well-mounted sail has the following benefits: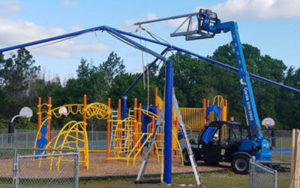
- enhanced wind resistance (it doesn’t rip or hit the anchors)
- the middle has no water accumulations (waterproof sails)
- reduced possibility of tearing longer sail and anchor lifespan.
- better visual outcome and reduced dirt accumulation in the fabric
- improved drainage—when correctly tensioned, even the shade sails can remove some water!
The shade sails and anchors are extremely durable and made specifically to handle extreme stresses. Although our anchors are not the cheapest, we are aware of this and have made particular designs that, in contrast to many others, allow for reliable and long-lasting tensioning.
“Tension your sails as much as possible” is our advice!
IDEAL ACTION IN THE EVENT OF RAIN
When it rains, a loose shade sail can quickly gather a significant amount of water.
The water’s weight has the potential to rip the sail, harm the anchors, and destroy the furniture underneath!
Rainwater can flow freely, and complete impermeability is ensured if the sail is correctly tight and at least one angle is inclined by around three feet.
 RESISTANCE TO WIND
In windy conditions, a poorly tight waterproof sail might droop dangerously, sending shockwaves and vibrations to the anchors.
The anchors are subjected to extreme tension that can cause damage, and the waterproof sail is prone to tearing.
A sail has more ability to “cut the wind” the tighter it is. The cloth does not shake or transfer the force of the wind to the anchors; instead, it remains motionless.
This also holds true for the permeable shade sail: the tighter and more circumferential it is, the better it will block the wind!
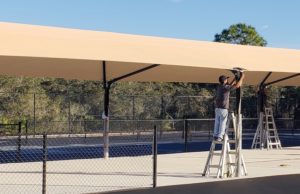
How to install a shade sail:
- Spread out the shade sail and align it with the steel framework for support. Keep in mind that the CSS warranty label needs to be facing down.
- Installing the perimeter edge cable is simpler when the shade sail is still in place. This cable passes through sleeves that are sewn onto the shade sail’s edges.
- Gently insert the cable through the sleeve, beginning at the corner with the CSS label. The rubber housing on the end of the cable is meant to protect the sleeve and prevent unintentional damage to the sail; do not remove it.
- Insert the cable through each of the four sleeves such that the two ends that remain extend out from the same corner by the same amount. Five feet more is the length of the cable than the circumference. This will make it possible to draw and tighten the cable ends after the shade sail is installed atop the structure.
- Carefully raise the sail from one side over the framework. Take extreme care to prevent the fabric from getting stuck on the support structure and avoid jerking it.
- Belt loops on the corners of the shade sail. We recommend tying ropes to these loops since it makes the operation of pulling over very simple.
- Hook each belt loop over the hook pin on the corner connector once the cloth is correctly positioned atop the steel support structure. Once more, having ropes on the belt hoops will be beneficial, but make sure the knots are undone on the ropes as well, as this will make it harder to remove the ropes later.
- At this point, the shade sail ought to be in place and secured with belt hoops over the corner connector hook pins.
- After passing through the sleeves, the cable hangs loosely on the corner connector’s exterior.
Pulling the cable around the perimeter tight: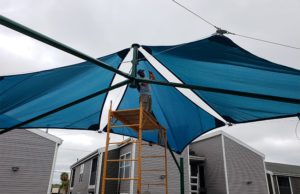
Using your hands, pull the cable’s two ends simultaneously until all of the slack is gone. Make sure the cable is attached under each corner’s cable hook pin.
- Before tightening the cable, we advise lubricating the region beneath the hook pin with WD 40 or another similar product. By doing this, cable slide around the changeover point will be facilitated.
- At each cable hook pin, the cable will glide over the belt loops.
- Attach the two U clamps that come with the cable to the corner connector where the two ends of the cable cross over. Hand-tighten loosely.
- Create a large loop at each end of the cable, then fasten it with a cable clamp. Each cable’s ends should be fastened to a ratchet strap, and the end of the strap should be rope-fastened to the post next to it. The goal is to tighten the cable in two opposing directions using the ratchet straps. This action needs to happen at the same time. Never try to tighten the cable by pulling just one end.
- Under no circumstances should a vehicle yank the cables.
- Gently tighten the cable, taking great care not to overtighten it or bend the posts inward. During this process, check the other three corners to make sure the wire is sliding easily and hasn’t kinked.
- Testing the cable’s movement along the midpoint of the structure’s 20-foot span will verify that the cables are correctly tensioned. With at least six inches, the cable should be able to be pushed inward, toward the hip.
- Pay close attention to any unfavorable reactions that may occur during the cable tightening procedure, such as posts bending, overtightening, cables becoming caught, etc.
- At this point, the belt loops and the perimeter edge cable should be firmly holding the shade sail in place.
- Tighten the two U bolts completely to prevent cable sliding in the future. Re-feed the remaining cable lengths into the sleeves.
- Take down the ropes and ratchet straps, then give the area a thorough cleaning.
Congratulations! The job is now done. Next time it will be easier.